무료 홈페이지 주소 받기
https://blog.wsgvet.com/free-homepage-address-freenom클라우드 플레어 가입 및 네임서버 변경하기
https://blog.wsgvet.com/cloudflare-sign-in-and-change-nameserver구글 클라우드 플랫폼 가입, 도메인 연결, Nginx 설치
https://blog.wsgvet.com/sign-in-google-cloud-platform-and-connect-domain-and-hello-world구글 클라우드 컴퓨트 엔진에서 우분투 기본 설정하기
https://blog.wsgvet.com/google-cloud-compute-engine-ubuntu-basic-setting우분투 20.04 LTS에 MariaDB 설치하기
https://blog.wsgvet.com/ubuntu-2004-install-mariadb/위 5개 글에 따라 따라오셨다면 이제 이 글을 보시면 됩니다.
구글 클라우드 무료 티어에서도 생각보다 빠릿하게 돌아가더라구요!
sudo apt update && sudo apt upgrade
위 명령어로 현재 패키지 리스트 업데이트 및 최신 패키지를 설치합니다.
sudo apt install php7.4-fpm php7.4-common php7.4-mysql php7.4-gmp php7.4-curl php7.4-intl php7.4-mbstring php7.4-xmlrpc php7.4-gd php7.4-xml php7.4-cli php7.4-zip zip unzip
위 명령어로 워드프레스에 필요한 패키지를 설치합니다.
sudo systemctl enable php7.4-fpm
위 명령어로 재부팅시에 자동 시작되게 합니다.
sudo systemctl start php7.4-fpm
위 명령어로 실행합니다.
sudo nano /etc/php/7.4/fpm/php.ini
위 명령어로 들어가면 엄청나게 많은 글의 내용이 나오는데요.
short_open_tag = Onmemory_limit = 256Mcgi.fix_pathinfo = 0upload_max_filesize = 100Mpost_max_size = 101Mmax_execution_time = 360date.timezone = Asia/Seoul
위 항목을 찾아서 다 바꿔줍니다.
찾는 방법은 컨트롤 + W 누르면 밑에 검색창이 나오는데, 앞부분을 복사해서 붙여넣고 엔터를 치면 찾아집니다.
예를들어 short_open_tag를 바꾸고 싶다면 short_open_tag 를 넣고 엔터를 치면 해당부분으로 갑니다.
참고로 short_open_tag는 처음 검색하면 설명 부분이 나오는데 한번더 검색하면 제대로 나옵니다.
cgi.fix_pathinfo는 아마도 ;cgi.fix_pathinfo = 1 이렇게 되어있을텐데요. 앞에 ; 은 주석으로 처리한다는 뜻이므로 이것도 빼야겠죠.
즉 ;cgi.fix_pathinfo = 1 을 cgi.fix_pathinfo = 0 이렇게 바꿔줘야 하는 것입니다.
그 뒤에 수정하면 됩니다.
참고로 upload_max_filesize와 post_max_size는 파일 업로드 용량과 매우 높은 관계가 있습니다.
업로드할 파일 크기가 크다면 100M 이상으로 해주셔도 됩니다.
그리고 밑에 Nginx 설정에서도 하나 더 변경해줘야 됩니다. 따로 설명드리겠습니다.
전부 찾아서 다 바꾼 후
컨트롤 + O, 엔터, 컨트롤 + X를 누르면 저장 후 빠져나와집니다.
sudo systemctl reload php7.4-fpm
위 명령어로 설정을 적용해줍니다.
sudo mysql -u root -p
위 명령어로 MariaDB로 들어갑니다.
CREATE DATABASE wpdb;
위 명령어로 wpdb라는 DB를 만듭니다.
CREATE USER 'wpdbuser'@'localhost' IDENTIFIED BY 'password';
위 명령어로 wpdbuser라는 MariaDB의 유저를 생성하고 그 비밀번호를 password로 합니다.
password를 꼭 자신에게 맞는 비번으로 바꾸세요! 이 비번은 DB입력할때 꼭 필요한 비번입니다.
GRANT ALL ON wpdb.* TO 'wpdbuser'@'localhost' WITH GRANT OPTION;
위 명령어로 wpdbuser유저가 wpdb라는 DB의 모든 권한을 가지게 됩니다.
FLUSH PRIVILEGES;EXIT;
저장 후 빠져나 옵니다.
cd /tmpwget https://wordpress.org/latest.tar.gztar -xvzf latest.tar.gzsudo mv wordpress /var/www/wordpress
위 4개의 명령어로 워드프레스 최신판을 다운로드하고, 압축을 풀고, /var/www/wordpress에 위치하게 합니다.
sudo chown -R www-data:www-data /var/www/wordpress/sudo chmod -R 755 /var/www/wordpress/
위 두 명령어로 해당 폴더의 소유권을 www-data에게 주고, 권한을 755로 줍니다.
먼저 Nginx 설정파일부터 만듭니다.
sudo nano /etc/nginx/sites-available/wordpress
위 명령어로 Nginx설정파일을 만들고 들어갑니다.
server {listen 80;listen [::]:80;server_name www.example.com example.com; # example.com를 자신이 원하는 도메인으로 수정하세요.root /var/www/wordpress;index index.php ;location ~ \.(gif|jpg|png)$ {add_header Vary "Accept-Encoding";add_header Cache-Control "public, no-transform, max-age=31536000";}location ~* \.(css|js)$ {add_header Cache-Control "public, max-age=604800";log_not_found off;access_log off;}location ~*.(mp4|ogg|ogv|svg|svgz|eot|otf|woff|woff2|ttf|rss|atom|ico|zip|tgz|gz|rar|bz2|doc|xls|exe|ppt|tar|mid|midi|wav|bmp|rtf|cur)$ {add_header Cache-Control "max-age=31536000";access_log off;}charset utf-8;server_tokens off;client_max_body_size 100M;location / {try_files $uri $uri/ =404;}location ~ /\.ht {deny all;}location ~ \.php$ {include snippets/fastcgi-php.conf;fastcgi_pass unix:/var/run/php/php7.4-fpm.sock;fastcgi_param SCRIPT_FILENAME $document_root$fastcgi_script_name;include fastcgi_params;}}
위 내용에서 example.com 부분을 자신의 도메인으로 바꿔주세요.
참고로 업로드 용량을 100MB 이상을 원하신다면 client_max_body_size 100M;를 client_max_body_size 1000M;와 같이 뒤에 숫자를 변경해주면 됩니다.
그리고 컨트롤 + O, 엔터, 컨트롤 + X 엔터를 누르면 저장 후 빠져나옵니다.
sudo ln -s /etc/nginx/sites-available/wordpress /etc/nginx/sites-enabled/
위 명령어로 설정파일을 활성화되게 해줍니다.
sudo rm -f /etc/nginx/sites-enabled/default
위 명령어로 기존 활성화된 default 서버 링크만 삭제해줍니다.
sudo nginx -t
위 명령어로 설정에 이상이 없는지 확인합니다.
$ sudo nginx -tnginx: the configuration file /etc/nginx/nginx.conf syntax is oknginx: configuration file /etc/nginx/nginx.conf test is successful
위와 같이 ok와 successful이 나오면 성공입니다.
sudo service nginx restart
위 명령어로 nginx를 재시작 해줍니다.
이제 python3-certbot-nginx를 통한 SSL 인증서 발급을 위한 준비는 끝났습니다.
sudo apt install python3-certbot-nginx
위 명령어로 Nginx와 연결할 수 있는 certbot을 설치합니다.
sudo certbot --nginx -d example.com -d www.example.com
이제 위와 같은 형식으로 자신의 도메인과 www.도메인에 SSL 인증서 생성을 시작합니다.
Saving debug log to /var/log/letsencrypt/letsencrypt.logPlugins selected: Authenticator nginx, Installer nginxEnter email address (used for urgent renewal and security notices) (Enter 'c' to cancel):
위와 같이 인증서 갱신 및 보안 공지 등을 받을 이메일 주소를 입력합니다.
Please read the Terms of Service athttps://letsencrypt.org/documents/LE-SA-v1.2-November-15-2017.pdf. You mustagree in order to register with the ACME server athttps://acme-v02.api.letsencrypt.org/directory- - - - - - - - - - - - - - - - - - - - - - - - - - - - - - - - - - - - - - - -(A)gree/(C)ancel:
A를 입력하고 엔터를 누릅니다.
Would you be willing to share your email address with the Electronic FrontierFoundation, a founding partner of the Let's Encrypt project and the non-profitorganization that develops Certbot? We'd like to send you email about our workencrypting the web, EFF news, campaigns, and ways to support digital freedom.- - - - - - - - - - - - - - - - - - - - - - - - - - - - - - - - - - - - - - - -(Y)es/(N)o:
이메일 주소를 공유하고 싶다면 y, 그렇지 않다면 n을 입력하고 엔터를 누릅니다.
Obtaining a new certificatePerforming the following challenges:http-01 challenge for example.comhttp-01 challenge for www.example.comWaiting for verification...Cleaning up challengesDeploying Certificate to VirtualHost /etc/nginx/sites-enabled/wordpressDeploying Certificate to VirtualHost /etc/nginx/sites-enabled/wordpressPlease choose whether or not to redirect HTTP traffic to HTTPS, removing HTTP access.- - - - - - - - - - - - - - - - - - - - - - - - - - - - - - - - - - - - - - - -1: No redirect - Make no further changes to the webserver configuration.2: Redirect - Make all requests redirect to secure HTTPS access. Choose this fornew sites, or if you're confident your site works on HTTPS. You can undo thischange by editing your web server's configuration.- - - - - - - - - - - - - - - - - - - - - - - - - - - - - - - - - - - - - - - -Select the appropriate number [1-2] then [enter] (press 'c' to cancel):
위와 같이 인증서가 발급됩니다. 2를 입력하고 엔터를 누르면 됩니다.
Redirecting all traffic on port 80 to ssl in /etc/nginx/sites-enabled/wordpressRedirecting all traffic on port 80 to ssl in /etc/nginx/sites-enabled/wordpress- - - - - - - - - - - - - - - - - - - - - - - - - - - - - - - - - - - - - - - -Congratulations! You have successfully enabled https://example.com and https://www.example.comYou should test your configuration at:https://www.ssllabs.com/ssltest/analyze.html?d=example.comhttps://www.ssllabs.com/ssltest/analyze.html?d=www.example.com- - - - - - - - - - - - - - - - - - - - - - - - - - - - - - - - - - - - - - - -IMPORTANT NOTES:- Congratulations! Your certificate and chain have been saved at:/etc/letsencrypt/live/example.com/fullchain.pemYour key file has been saved at:/etc/letsencrypt/live/example.com/privkey.pemYour cert will expire on 2021-01-29. To obtain a new or tweakedversion of this certificate in the future, simply run certbot againwith the "certonly" option. To non-interactively renew *all* ofyour certificates, run "certbot renew"- Your account credentials have been saved in your Certbotconfiguration directory at /etc/letsencrypt. You should make asecure backup of this folder now. This configuration directory willalso contain certificates and private keys obtained by Certbot somaking regular backups of this folder is ideal.- If you like Certbot, please consider supporting our work by:Donating to ISRG / Let's Encrypt: https://letsencrypt.org/donateDonating to EFF: https://eff.org/donate-le
위와 같이 매우 쉽게 발급이 되었고, Nginx도 재기동되어 이제 주소창에 자신의 주소를 입력하면 바로 https로 접속되는 것을 확인할 수 있습니다.
정말 쉽죠?
sudo systemctl status certbot.timer
위 명령어를 내리면
● certbot.timer - Run certbot twice dailyLoaded: loaded (/lib/systemd/system/certbot.timer; enabled; vendor preset: enabled)Active: active (waiting) since Sat 2020-10-31 14:07:53 UTC; 14min agoTrigger: Sun 2020-11-01 01:50:41 UTC; 11h leftTriggers: ● certbot.service
위와 같이 나오는 것을 확인할 수 있습니다. 즉 하루에 2번씩 자동으로 갱신 체크를 해줍니다.
sudo certbot renew --dry-run
위 명령어를 내리면
Saving debug log to /var/log/letsencrypt/letsencrypt.log- - - - - - - - - - - - - - - - - - - - - - - - - - - - - - - - - - - - - - - -Processing /etc/letsencrypt/renewal/example.com.conf- - - - - - - - - - - - - - - - - - - - - - - - - - - - - - - - - - - - - - - -Cert not due for renewal, but simulating renewal for dry runPlugins selected: Authenticator nginx, Installer nginxRenewing an existing certificatePerforming the following challenges:http-01 challenge for example.comhttp-01 challenge for www.example.comWaiting for verification...Cleaning up challenges- - - - - - - - - - - - - - - - - - - - - - - - - - - - - - - - - - - - - - - -new certificate deployed with reload of nginx server; fullchain is/etc/letsencrypt/live/example.com/fullchain.pem- - - - - - - - - - - - - - - - - - - - - - - - - - - - - - - - - - - - - - - -- - - - - - - - - - - - - - - - - - - - - - - - - - - - - - - - - - - - - - - -** DRY RUN: simulating 'certbot renew' close to cert expiry** (The test certificates below have not been saved.)Congratulations, all renewals succeeded. The following certs have been renewed:/etc/letsencrypt/live/example.com/fullchain.pem (success)** DRY RUN: simulating 'certbot renew' close to cert expiry** (The test certificates above have not been saved.)- - - - - - - - - - - - - - - - - - - - - - - - - - - - - - - - - - - - - - - -IMPORTANT NOTES:- Your account credentials have been saved in your Certbotconfiguration directory at /etc/letsencrypt. You should make asecure backup of this folder now. This configuration directory willalso contain certificates and private keys obtained by Certbot somaking regular backups of this folder is ideal.
위와 같이 Congratulations, all renewals succeeded. 내용이 뜨면 갱신에 문제가 없다는 뜻입니다.
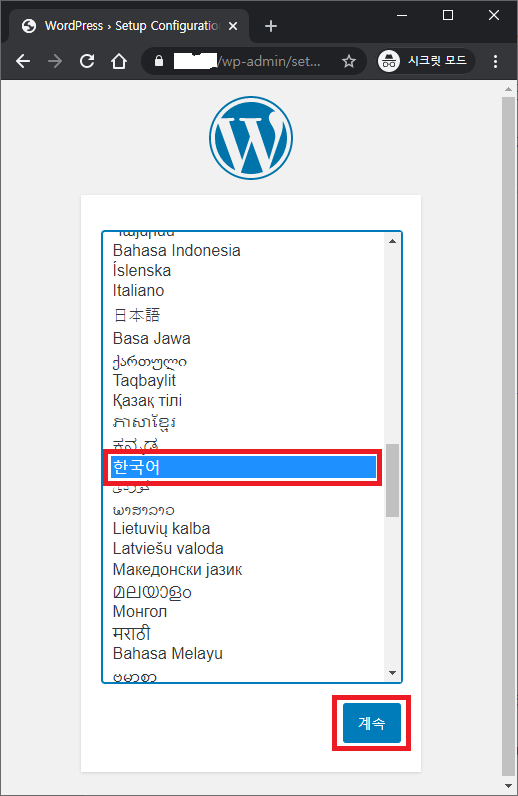
이제 주소창에 설정한 주소 를 넣어보세요.
위와 같이 언어설정부터 나옵니다.
한국어를 선택 후 계속을 눌러주세요.
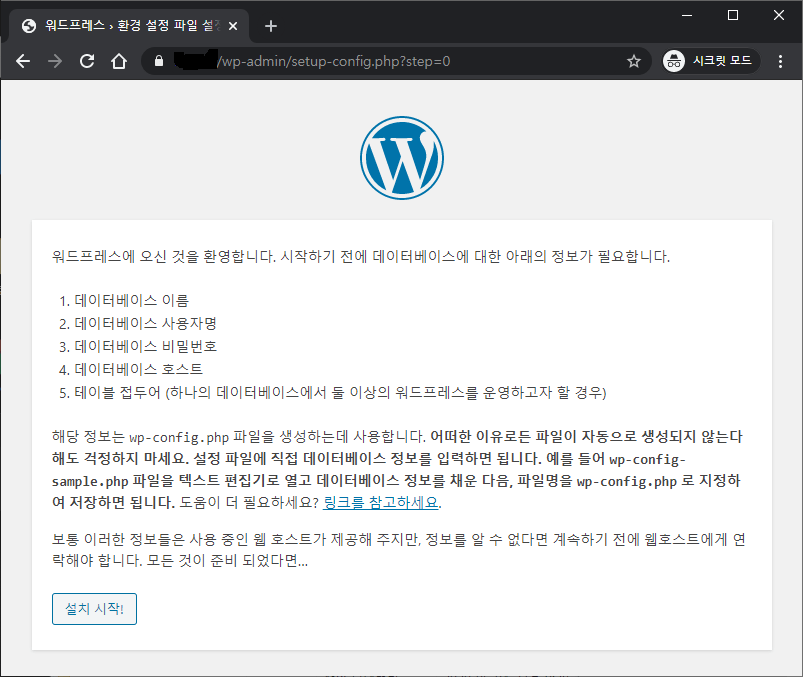
설치시작!을 누르세요
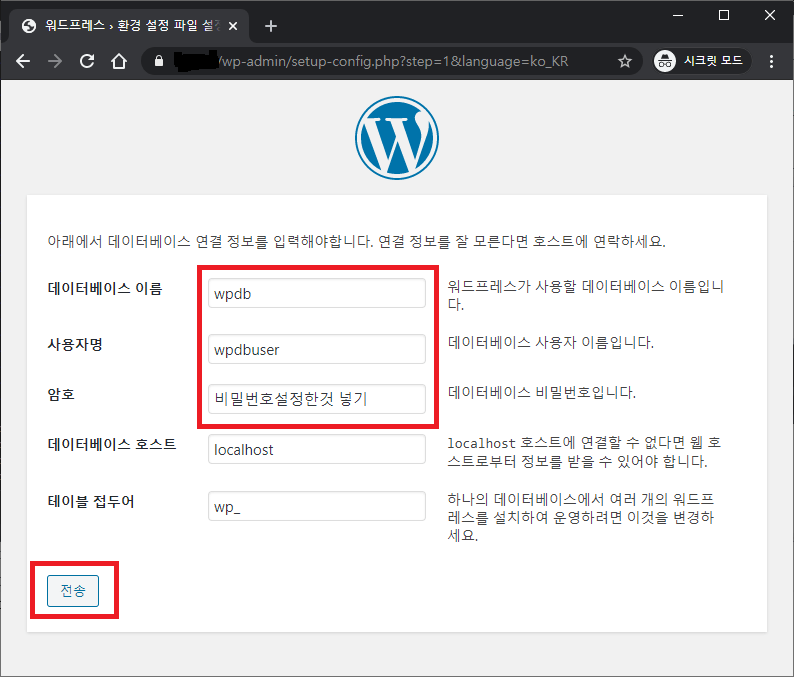
위와 같이 아까 DB 만들었던 그 내용을 넣으면 됩니다.
데이터베이스 이름에 wpdb 를 넣고
사용자명에 wpdbuser 를 넣고
암호는 password 대신에 넣었던 자신의 비번을 넣으면 됩니다.
데이터베이스 호스트와 테이블 접두어는 그대로 두고 전송을 누릅니다.
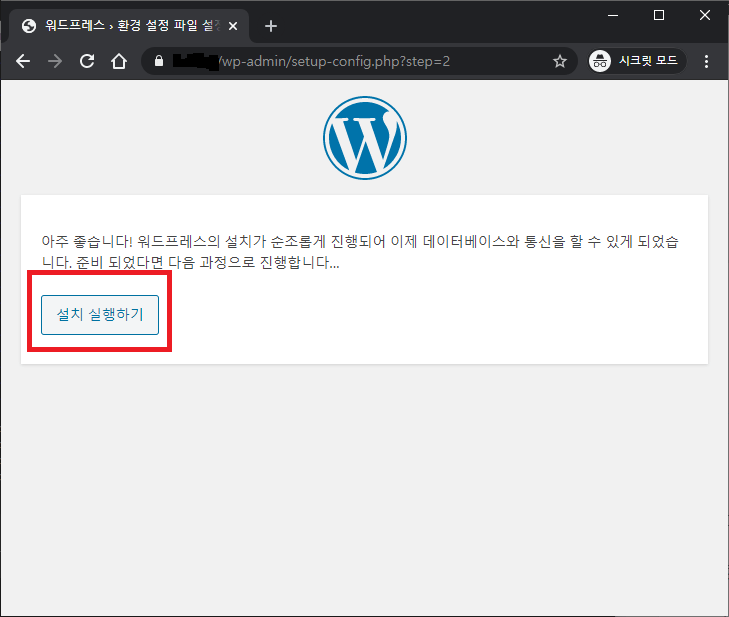
설치 실행하기를 누릅니다.
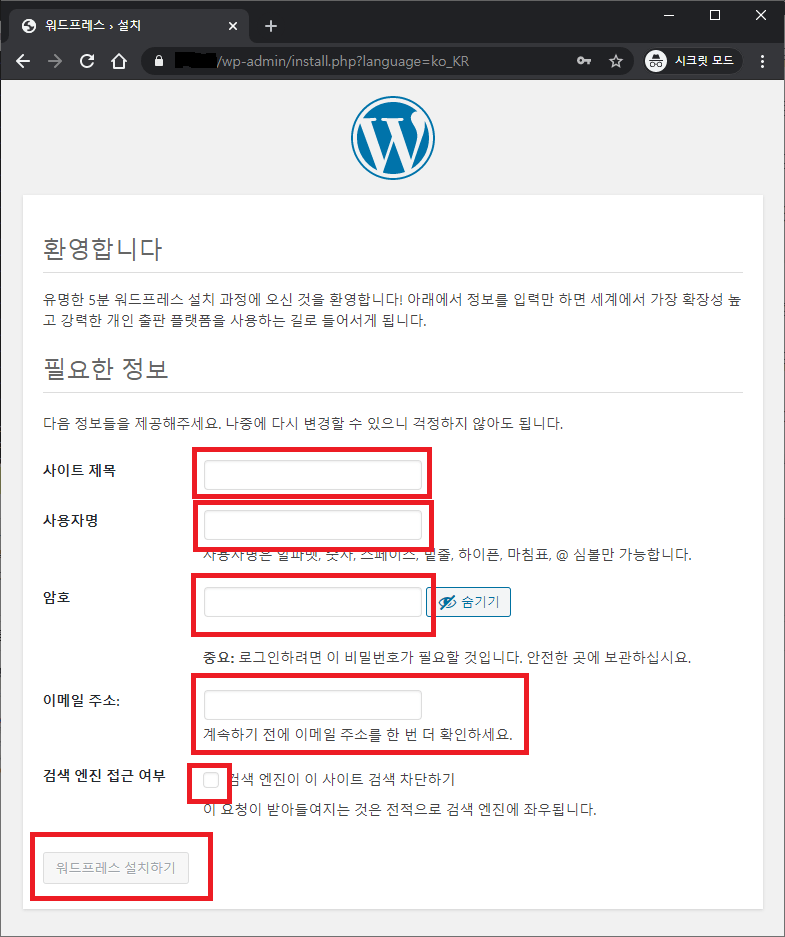
사이트 제목은 원하는 이름을 넣으면 됩니다.
사용자명은 접속 ID입니다.
암호는 원하는대로 넣으시고
이메일 주소도 자신의 주소를 넣으면 됩니다.
나중에 바꿀때 인증 메일을 받을 수 있게 실제 사용하는 이메일을 넣는게 좋겠죠
그리고 검색 엔진 접근 여부는 이 사이트에 검색 엔진이 들어와서 검색에 걸리도록 할지 말지 결정하는 것입니다.
그리고 다 되었다면 워드프레스 설치하기를 누르세요.
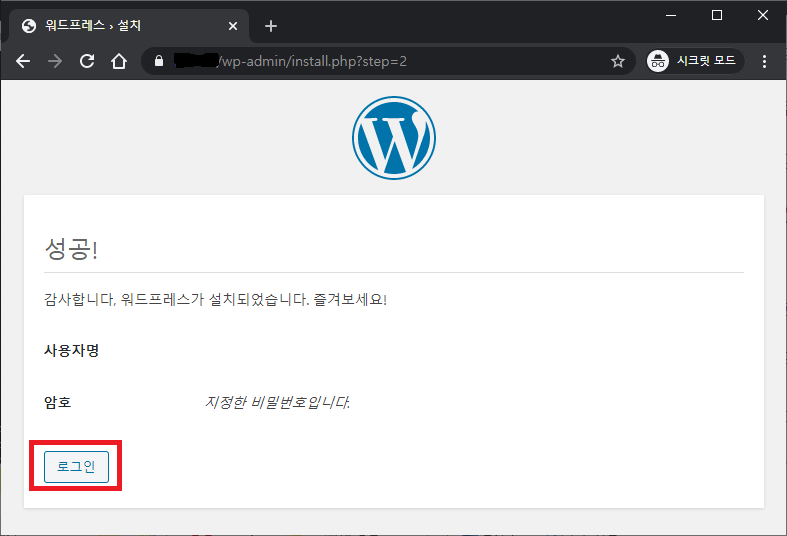
이제 성공!이 떴습니다. 자신의 아이디가 나오고 로그인을 누르세요
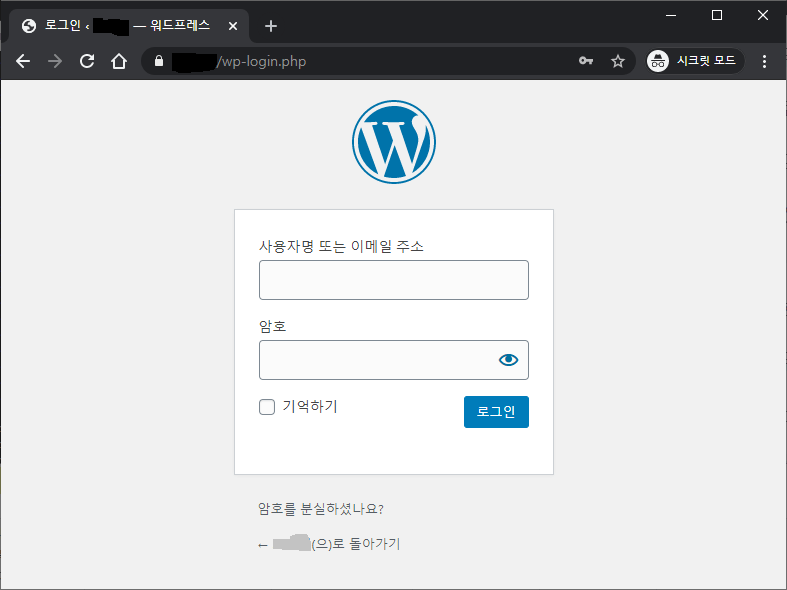
사용자명에 아이디를 넣고 암호에 비번을 넣고 로그인을 합니다.
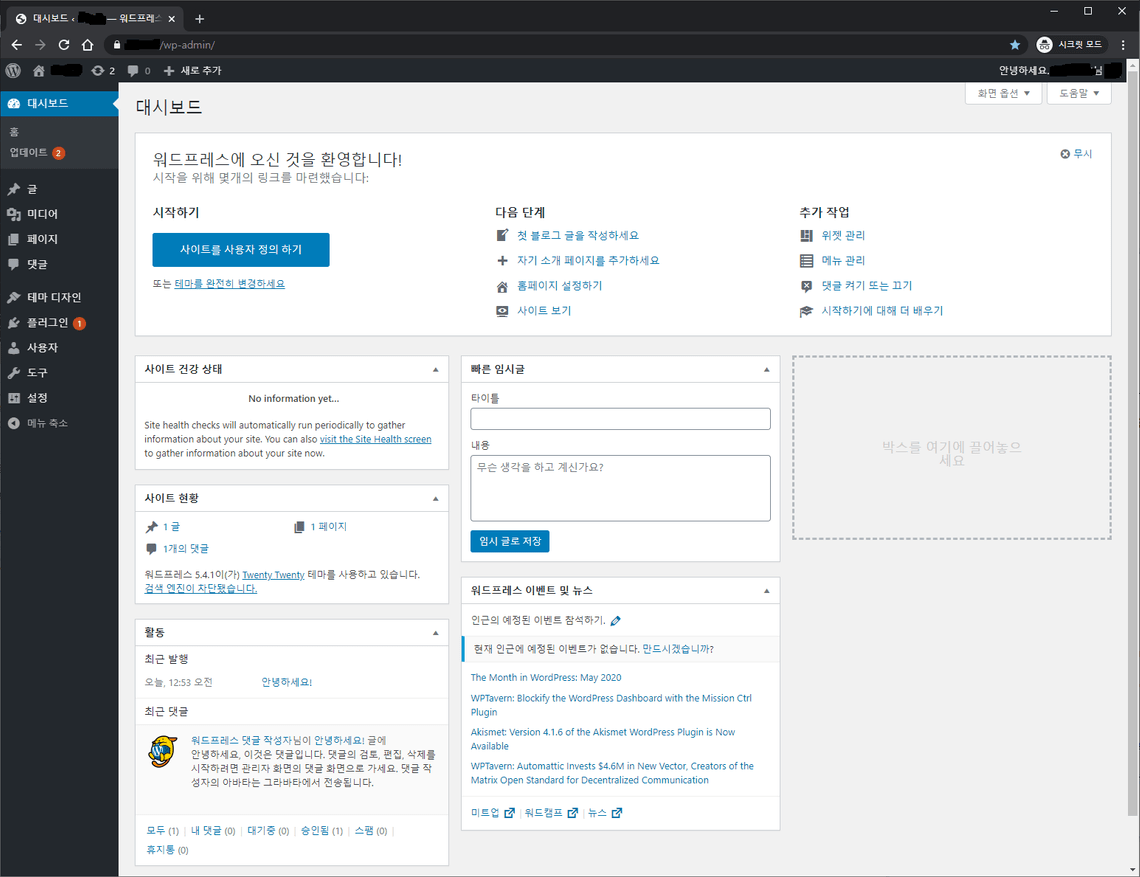
드디어 메인 관리자 페이지가 떴습니다! 고생하셨어요!!!
참조사이트
How to Install WordPress on Ubuntu 20.04 | 18.04 with Nginx and Let’s Encrypt | Website for Students
https://websiteforstudents.com/how-to-install-wordpress-on-ubuntu-20-04-18-04-with-nginx-and-lets-encrypt