참고사항
이 글은 와일드카드 인증서 발급을 위한 글입니다.
각종 CMS뿐만 아니라 여러가지 서비스에서 서브도메인에 대한 제약없이 SSL 인증서 적용에 최적화되어 있습니다.
단순히 그누보드, 워드프레스, 고스트 블로그를 1개만 운영할 예정이라면 굳이 따라하지 않아도 됩니다.
1개만 운영하시는 분을 위해 각 챕터에서 쉽게 적용하는 가이드를 적어두었습니다.
들어가며
보통 1개의 도메인만 발급 받는 경우가 많은데요. (예를들면 wsgvet.com 하나)
추후 확장성 및 관리의 용이성을 위해 Wildcard SSL 인증서를 받을 것입니다.
wsgvet.com와 *.wsgvet.com가 가능한거죠. 나중에 blog.wsgvet.com 라든지, bbs.wsgvet.com 모두 하나의 인증서로 SSL 연결이 가능합니다.
클라우드 플레어에서만 설정하면 바로 발급되므로 추천드립니다.
7월 24일 전에 와일드카드 인증서를 적용하신 분은 꼭 1번의 방법으로 다시 해주셔야 합니다.
기존 방식으로 발급받은 경우 certbot renew 명령어로 갱신하면 에러가 뜹니다.
그 이유는 manual 방식으로 발급 받은 경우 자동 갱신이 안되기 때문입니다.
자동발급 및 갱신
1. acme.sh를 사용한 SSL 인증서 발급받기
(1) Freenom에서 발급 받지 않은 유료 도메인(.com, .net, .co.kr 등등)
DNS 인증을 통한 acme.sh Letsencrypt SSL 인증서 발급받기위 링크를 그대로 따라하시면 매우 편하게 클라우드플레어 API를 통한 와일드카드 인증서 발급 및 자동갱신을 적용할 수 있습니다.
(2) Freenom에서 발급 받은 무료 도메인 ga,ml,cf,gq,tk 을 위한 방법
무료도메인의 경우 Cloudflare의 DNS API 방식으로는 발급이 불가능합니다. 따라서 Wildcard 인증서를 발급 받을 경우 자동 갱신이 되지 않습니다.
DNS 인증방식으로 자동 발급 및 와일드카드 인증서 자동 갱신을 위해서는
무료 도메인이 아닌 유료 도메인을 구입한다.
Cloudflare가 아닌 다른 DNS 서비스를 이용한다. ( LuaDNS 등)
위 2가지 방식으로 와일드카드 인증서를 발급 받을 수 있습니다.
LuaDNS API를 이용한 무료도메인 와일드카드 SSL 인증서 발급 받기위 링크를 통해서 클라우드플레어가 아닌 LusDNS를 통해 무료도메인도 와일드카드 인증서를 발급받을 수 있습니다.
webroot 방식보다 DNS 방식으로 발급 받는 것이 훨씬 편하므로 강력 추천드립니다.
수동발급 및 수동갱신
2. letsencrypt를 통해 SSL 인증서 발급받기
(3개월마다 수동 인증 필수이므로 추천하지 않습니다.)
인증서 발급 패키지인 certbot을 먼저 설치합니다.
위 명령어를 넣고 y엔터 후 바로 설치됩니다.
이제 위와 같은 형식으로 넣어주면 됩니다.
youremail@email.com은 반드시 자신의 이메일로 바꿔주시고,
yourdomain.com 도 자신의 도메인으로 바꿔주세요.
위 명령어를 자신에게 맞게 수정 후 넣으면
Saving debug log to /var/log/letsencrypt/letsencrypt.log Plugins selected: Authenticator manual, Installer None
Would you be willing to share your email address with the Electronic Frontier Foundation, a founding partner of the Let’s Encrypt project and the non-profit organization that develops Certbot? We’d like to send you email about our work encrypting the web, EFF news, campaigns, and ways to support digital freedom.
(Y)es/(N)o:
위와 같이 이메일 주소를 공유할거냐 물어보는데, 원하시면 y 엔터 누르시면 됩니다.
Obtaining a new certificate Performing the following challenges: dns-01 challenge for aced.ga dns-01 challenge for aced.ga
NOTE: The IP of this machine will be publicly logged as having requested this certificate. If you’re running certbot in manual mode on a machine that is not your server, please ensure you’re okay with that.
Are you OK with your IP being logged?
(Y)es/(N)o:
그리고 위와 같이 물어보는데 y 엔터를 누릅니다.
Please deploy a DNS TXT record under the name _acme-challenge.aced.ga with the following value:
YeVmGJHxJ6UPbRbcJU어쩌고저쩌고
Before continuing, verify the record is deployed.
Press Enter to Continue
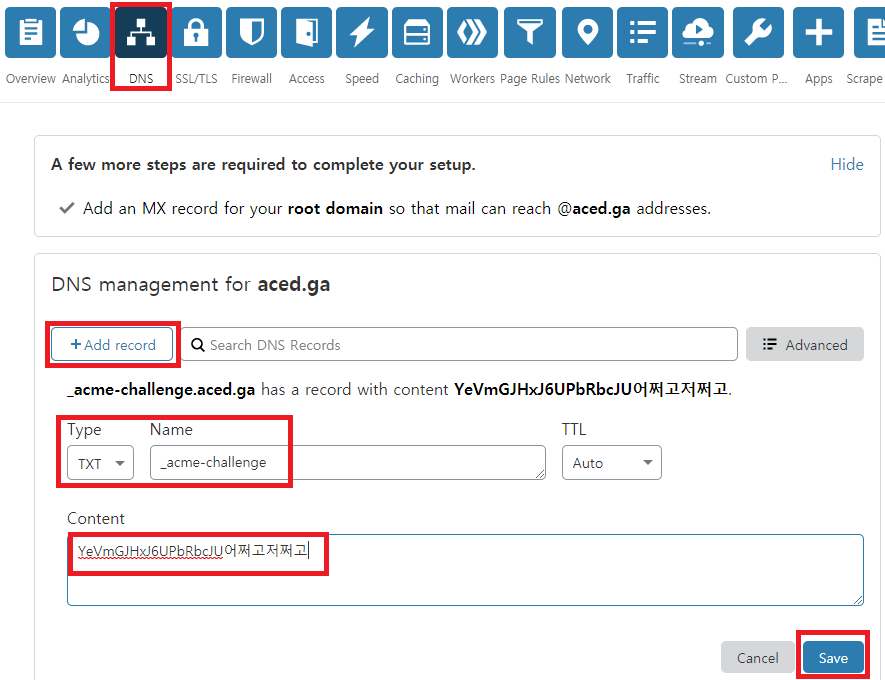
이제 클라우드플레어 https://cloudflare.com 접속해서 DNS 부분에 들어갑니다.

위와 같이 +Add record를 누르르고 Type에는 TXT, Name에는 _acme-challenge 를 넣고 Content에 YeVmGJHxJ6UPbRbcJU어쩌고저쩌고 를 넣고 Save를 누릅니다.
참고로 ‘YeVmGJHxJ6UPbRbcJU어쩌고저쩌고’ 는 타이핑하는게 아니라 SSH 화면 부분을 마우스로 긁으면 자동으로 복사됩니다. 그리고 컨트롤+V를 누르면 붙여넣기가 됩니다.
그리고 아까 인증서를 발급 받는 곳으로 돌아가서 엔터를 누릅니다.
Please deploy a DNS TXT record under the name _acme-challenge.aced.ga with the following value: yVOwRCb3yn5QUujoJ93-BDOyXs2Q어쩌고저쩌고저쩌고2 Before continuing, verify the record is deployed. (This must be set up in addition to the previous challenges; do not remove, replace, or undo the previous challenge tasks yet. Note that you might be asked to create multiple distinct TXT records with the same name. This is permitted by DNS standards.)
Press Enter to Continue
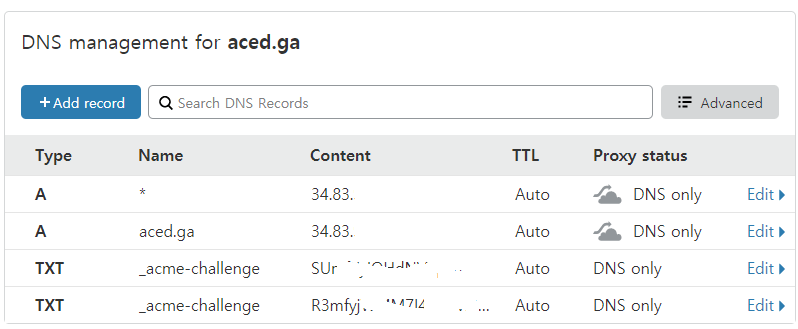
아까와 똑같이 +Add record를 누르르고 Type에는 TXT, Name에는 _acme-challenge 를 넣고 Content에 yVOwRCb3yn5QUujoJ93-BDOyXs2Q어쩌고저쩌고저쩌고2 를 넣고 Save를 누릅니다.

그러면 대략 위와 같은 화면으로 구성이 됩니다. (Content 부분은 수정하였습니다.)
다시 SSH 창으로 돌아와서 엔터를 누릅니다.
그러면
Waiting for verification… Cleaning up challenges
IMPORTANT NOTES:
Congratulations! Your certificate and chain have been saved at: /etc/letsencrypt/live/aced.ga/fullchain.pem Your key file has been saved at: /etc/letsencrypt/live/aced.ga/privkey.pem Your cert will expire on 2020-08-26. To obtain a new or tweaked version of this certificate in the future, simply run certbot again. To non-interactively renew all of your certificates, run “certbot renew”
Your account credentials have been saved in your Certbot configuration directory at /etc/letsencrypt. You should make a secure backup of this folder now. This configuration directory will also contain certificates and private keys obtained by Certbot so making regular backups of this folder is ideal.
If you like Certbot, please consider supporting our work by:
Donating to ISRG / Let’s Encrypt: https://letsencrypt.org/donate Donating to EFF: https://eff.org/donate-le
위와 같이 성공적으로 발급이 되었습니다.
Your certificate and chain have been saved at: /etc/letsencrypt/live/aced.ga/fullchain.pem Your key file has been saved at: /etc/letsencrypt/live/aced.ga/privkey.pem
여기서 위 내용이 매우매우매우 중요합니다. 와일드카드 인증서의 경로를 알려주는데요.
다음에 Nginx SSL에 매우 필수적인 경로입니다. 이 경로는 꼭 저장해주시는게 좋습니다.
